The gambeson is finished and has been tested at practice as fight garb. It has turned out very well, I think. I made a few mistakes and learned from them, but overall I am satisfied. Below are pics of the process as well as the final product.
Bear in mind, I'm very new to machine sewing. I've been hand sewing for a long time but other than belt flags, this is the first garment I've sewn. I made some noob mistakes but I'm still learning. Also, forgive the grainy pics. My iPhone is really the only camera I have. Here goes:
I used the pattern/tutorial listed above, but primarily I followed one I found as a Google result
>>here<<.

This is the fabric I used. Pre-quilted fabric from Jo-Ann's. It's a poly-cotton fabric with cotton stuffing, sewn down with a diamond pattern. I bought two yards of burgundy and two of wood brown; the fabric was priced at $10/yd but I got it half off
I began by taking my measurements, as per the the tutorials. ThenI cut out four rectangles of the fabric to match my torso measurements, and cut them to the necessary shape-- mostly a slope to fit my ribs and the arm/neck holes. I sewed the back together, then sewed the sides together. I left the front open and hemmed the edges.
 MISTAKE #1: I should not have sewn the sides together. I should have sewn it at the shouldersinstead, which would have made tweaking the neck hole much easier. Instead, I did it this way, which caused me to make errors finishing the neck hole; the result was a deep slope in the neck line that I did not want.
Next I sewed together the leg flanges, done very similarly to the torso. Four pieces, two of each color; sewn together two at a time, one for the right, one for the left, and attached. Then I hemmed the inside and decided to cant the inside corner for extra stylez.


Next came the collar. As I said, I mucked up the neckline, so I had to design the collar to make the plunged neckline look like it belonged. My solution was just a tall and wide straight collar, made from the fabric doubled over, and sewn into the neckline. Like everything else, I chose alternating colors.

Then came the closures. I contemplated using frogs, but decided I didn't like the look. I wanted buckles, but a point was made in this thread that stuck with me: they can be a pain beneath armor. Instead, I chose decorative eyehook clasps.
MISTAKE #2: After affixing the eyehooks, I realized my measurements were off. The hooks were scooted back as far as I could have them and they did not close tightly enough; indeed they would slip open one by one with any movement on my part. In giving myself extra fabric for seam tolerance, I ended up adding a couple inches to the overall size of the gambeson itself.This turned out to be a relatively happy mistake because it pointed me to my decided closures: buttons. I found some kickass buttons at Jo-Ann's and sewed them in, and the gambeson fits like a glove as a result.


And so the body of the gambeson was done. Then came the sleeves. I cut two rectangles of fabric, one of each color, and measured my bicep, elbow, forearm, and wrists, as well as the overall length from shoulder to hand. I folded the fabric and sewed the slope I'd marked, as well as curve for where the sleeve would affix to the shoulder. I hemmed the cuff, and then hemmed the shoulder part.
 MISTAKE #3: I realized it was a good idea to double up the fabric for the agilet holes on the sleeve, but also realized that I had not done so on the body of the gambeson. At this point I felt it was too late. Another time when I have the energy I may handstitch another later beneath the gambeson's agilet holes and redo them, but for now, I'm stuck with one layer there.
Then I cut all the agilet holes. I decided to go with two: one on the top of the shoulder and one in front. I chose not to do one in back as well because it failed my fitting test. I put everything on and pinned the sleeves on, pulling my arms in over my chest; the pins in the back bent and came out. I was too afraid the tie or the fabric would rip in the back, and decided I didn't need the third hole anyway. The two holes per arm proved enough.
I made the agilet holes by cutting button-holes basically, using multiple lines of tight stitches in a rectangle around the hole, followed by wrapping a hand stitch into the hold to pull the fabric aside. Each time I inserted the handstitch I made sure to do so on the outside of the machine stitch make its hold stronger.


With the sleeves done, all that was needed was for it to be strung together. I'm still looking for a permenant tie-- some strong leather lace would do nicely-- but for now I'm using thick black ribbon.
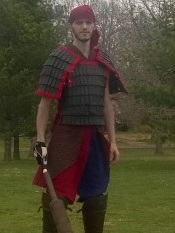
As it was a colder day, I wore the gambeson to practice yesterday. It was extremely comfortable beneath my armor; it moved with me, it breathed, it stayed where it was supposed to. After most of the day I discarded my armor and took off the sleeves, fighitng in just the gambeson. No issues whatsoever. It's really not too hot and it's very comfortable.
And, if I may say so, it looks pretty spiffy (even in dramatic poses and with gym shoes).

Some notes:
I intentionally left the seams uncovered on the inside. I did this because I was concerned about the fabric tearing so I wanted to make sure it would be easy to snip the stitches to replace whatever needs it.
In the end I spent about thirty dollars to get everything I needed.