Page 1 of 1
Tactical exercise 5

Posted:
Thu Feb 21, 2008 8:06 pmby Kyrian
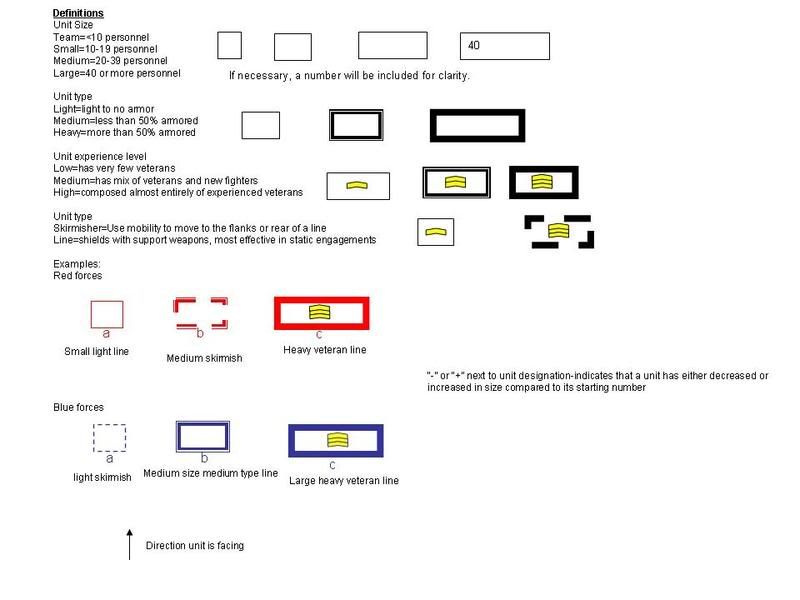
I've introduced some additional notations for the exercises. If you have any questions, please let me know.
I. This is a variation of a many-versus-few scenario. The red forces have significantly more armor and experience but are outnumbered 2:1. The objective is to eliminate all of the enemy forces.
II. Red forces:
a. Experienced, heavily armored, line unit (40)
b. Experienced, heavily armored, skirmish team (8 )
c. Experienced, heavily armored, skirmish team (8 )
d. Experienced, heavily armored, skirmish team (8 )
e. Experienced, heavily armored, skirmish team (8 )
f. Experienced, heavily armored, skirmish team (8 )
g. Experienced, heavily armored, skirmish team (8 )
III. Blue forces:
a. Low experience, medium armor, skirmish unit (40)
b. Medium experience, medium armor, line unit (40)
c. Medium experience, medium armor, line unit (40)
d. Low experience, medium armor, line unit (40)
IV. Organization (from the blue force's perspective)
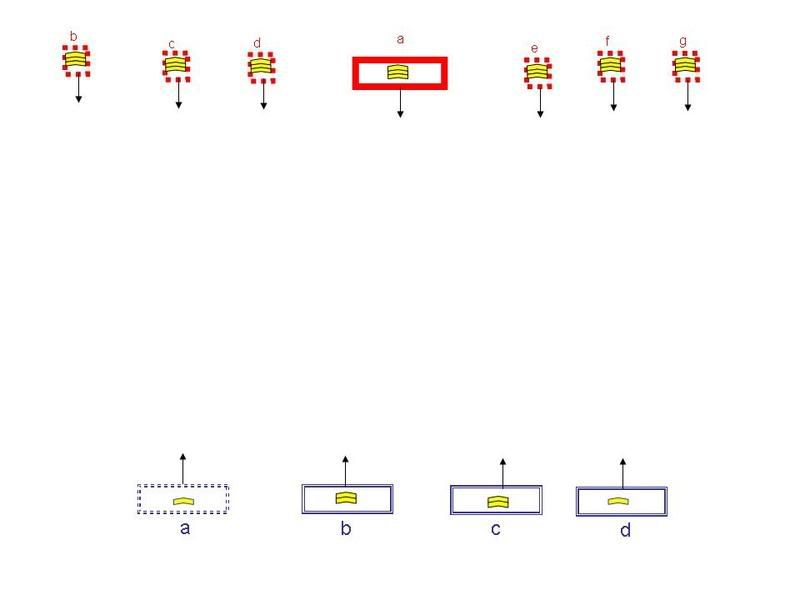
Blue forces commander, how would you deploy your forces?
Posted:
Thu Feb 21, 2008 9:04 pmby Djinn aka D
I would use the skirmish group to occupy the heavy line, light engaging and pulling them away from the skirmish groups. I would use two of the medium lines (med XP) to sweep the skirmish groups, flanking the heavy line. The last medium line (low XP) would be held in reserve until either the skirmish group started to be overrun or the skirmish groups were destroyed. then i would have all three lines push into the heavy line and have the skirmish group float and punch in where they could
Posted:
Thu Feb 21, 2008 9:33 pmby Kyrian
Djinn Al-Asker wrote:I would use the skirmish group to occupy the heavy line, light engaging and pulling them away from the skirmish groups. I would use two of the medium lines (med XP) to sweep the skirmish groups, flanking the heavy line. The last medium line (low XP) would be held in reserve until either the skirmish group started to be overrun or the skirmish groups were destroyed. then i would have all three lines push into the heavy line and have the skirmish group float and punch in where they could
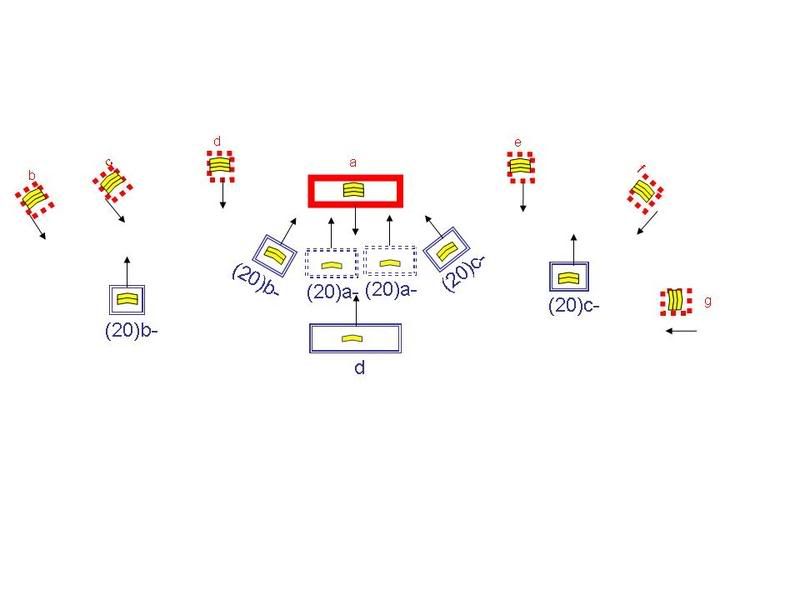
I'm going to use your plan but give red forces an opportunity to respond to your initial deployment:
As you move your large skirmish unit to engage the heavy line, red's skirmish teams immediately flank out with the intent of stringing out your less experienced lines. Their intent is to separate your line units into smaller groups that can be defeated piecemeal. Red team a is counting on you to engage since they have the advantage in both armor and experience. Even though you have a skirmish unit, it still must close to melee range in order to engage:

Posted:
Thu Feb 21, 2008 11:16 pmby Arrakis
From there, my Dur-Demarion-honed instincts tell me to roll Blue B back around the back side of Blue A, letting Blue B engage Red a for just a moment before rolling B and A to follow Blue D around in a fully flanked sweep of Reds g, f and e.
With the skirmisher clusters overwhelmed (preferably shield bash overrun), I'd want to run a swirling light-fight, basically playing keep-away-from-the-Heavies and letting my ranged fighters and florentiners pick at the lead fighters of the pursuing units and hope we've leveled the odds enough to whoop 'em.
I'm sure this whole plan is obviously a Dur-D strategy. All we do is flank!
Feel free to ignore this, if this wasn't what I was supposed to do?
Posted:
Fri Feb 22, 2008 9:23 amby Sir Farrin
I would split Blue B and C in half and hit the outer edges of red A
I would also split blue A in half to hit Red D, E, F, and C
The remaining Blue B and C would also hit Red D, E, F, and C
Lastly have blue D follow in to hit red A for help with clean up and mopping up the red B and G
Posted:
Fri Feb 22, 2008 11:23 amby Thomas MacFinn
I think if you told blue unit A to attack red unit A, the blue unit (being both skirmishers and new) would split themselves in an effort to flank red unit A. They would dissolve into either disarray or several small units.
If the latter happened, some of those small blue units would go after red D & E, again without being told to, unless the flanking blue units got in the way, in which case they would just absorb themselves into the flanking blue units.
Posted:
Fri Feb 22, 2008 8:16 pmby Big King Jimmy
Farrin's idea of splitting blue a and hitting both sides of red a, then having blue d charge through, but add in a wedge formation, spefically trying to break through the line, and reform behind them.
Posted:
Sat Feb 23, 2008 6:37 pmby Cib
Woops!

Posted:
Sat Feb 23, 2008 6:37 pmby Cib
Posted:
Sat Feb 23, 2008 6:47 pmby Cib
Or... This?

Its those nasty skirmish groups that are saving Red A from a lot of hurt, so.
1.
a. I send in the blue skirmish group to distract them, not really engaging, just darting in and out, using there speed over there heavy Red A to there advantage.
b. I have the Med lines C and D eliminate the red skirmish groups on the right. I am banking on the combination of superior numbers, and a bit more protection to overwhelm the Red skirmish groups.
c. I have Blue B do there best on the left, but mostly just try not to die to quickly.
2.
a. When C and D have taken out Red E F G they move in on Red A.
b. My skirmish group then has the option of ether only engaging Red A or splitting in two one half attacking Red A and the other assisting Blue B if they are really hurting.
... Dang it! I now wonder if Blue A and D should be switched... Naaa...
Posted:
Sat Feb 23, 2008 6:55 pmby Cib
^Edit^
Posted:
Mon Feb 25, 2008 12:22 amby angus
going from the second photo:
Have Blue A hold position in front of Red A, drawing Red A forward
Blue D holds position behind Blue A
Blue B and Blue C push directly forward through the skirmishers in front of them, reforming behind or on the flanks of Red A
If Red A engages Blue A, then Blue D commits to the fight and both units attempt to tie-up Red A long enough for Blue B & C to push through flanking forces. Blue B & C then charge into Red A's sides or rear, perhaps peeling a few fighters from each unit to handle stragglers left from Red B-G and secure Blue's rear & flanks...
Posted:
Sun Mar 16, 2008 2:09 pmby bo1
from kyrians picture i would have blue b get in contact with blue a at a 90* angle back to deny the flank. blue d + c move right and and fast to crush the flank. not stopping until red e+f+g are pushed into red a. this would use the blue wall while not letting red skirmishers to be as effective.
i would not allow under any circumstance blue A to engage red A. giving up power on every front. less exp, armor, tactically not good for skirmish. blue a would get crushed in that instance.
Posted:
Sun Mar 16, 2008 10:01 pmby Big King Jimmy
Did Kyrian die?
Posted:
Sun Mar 16, 2008 11:19 pmby Kyrian
Big Jimmy wrote:Did Kyrian die?
Nope. I just haven't had time to put together a response. Hopefully, sometime this week...
Posted:
Wed Mar 19, 2008 5:14 pmby Kyrian
farrin wrote:I would split Blue B and C in half and hit the outer edges of red A
I would also split blue A in half to hit Red D, E, F, and C
The remaining Blue B and C would also hit Red D, E, F, and C
Lastly have blue D follow in to hit red A for help with clean up and mopping up the red B and G
Using Farrin's setup, blue would look like this:
Posted:
Wed Mar 19, 2008 5:16 pmby Kyrian
Red forces will respond like this:
Blue commander, how will you respond?
Posted:
Wed Mar 19, 2008 5:20 pmby Arrakis
By losing.
This position is now unsalvagable. I would just try to get as many kills as possible before we were overwhelmed.
Posted:
Wed Mar 19, 2008 10:05 pmby bo1
i agree, a total loss is inevitable.
right flank is giving up experience and tactics.
center is going to get ganked in the back from the right side by Red E, on the left by red D, it will hapen quick too, cause they are good vets and armored. not to mention that they will lose a straight up fight against that block.
left flank is over powered on all fronts as well. i see no movement that will improve the out come.
the only thing i can see is if blue says f'it, lets have blue a-both units slide right hard and try to redirect the battle. this hangs out to dry the left flank, but they are dead to us anyway. so tell them to fight defencively to slow those fighters of red on that flank. then it would help the blue c- on the right to get help.
could go left too, but history says moving right is better with righties in the army. try to drop the flankers on that side then turn in to handel the middle again, but at their side insted of front.
maybe tell blue d to engage but again be defensive.
outside chance of being successful but atleast it gets the army away from a DIP manuver.
Posted:
Thu Mar 20, 2008 11:57 amby Kyrian
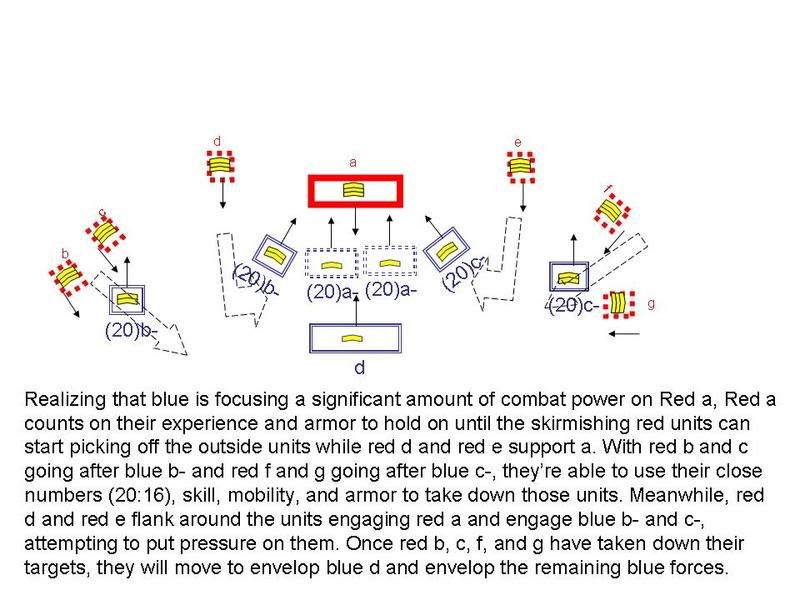
I believe that this could have been won by blue forces if they had not split up. In my opinion, splitting blue's forces plays exactly into what red skirmishers would have wanted...smaller units that they can tear apart piecemeal. In particular, the splitting in half of blue b and blue c probably doomed them in this scenario. Military doctrine says that you should never attack unless you have at least a 3:1 ratio. Anything less implies that you're going to suffer heavy casualties. With the armored, mobile, skilled, skirmishers of red b, c, f, and g hitting those blue b and c detachments, they would go through them fairly efficiently. All that would be left would be the unskilled d trying to push through but getting getting whomped on the flanks and rear by the heavy skirmishers.
If I were blue, I would probably try to bring b and c with d serving as reinforcement while a covers a flank. I would try very hard to keep everyone in a position for mutual support since a strung-out line is exactly what the heavy skirmishers would want.
Posted:
Thu Mar 20, 2008 12:01 pmby Kyrian
Is there a particular scenario people might be interested in doing, i.e., convoy, beach assault, trapped on a mountain top, or something in a more historical vein? We could also keep working on this scenario with a different blue plan.
Posted:
Thu Mar 20, 2008 12:11 pmby Kensman Bam
I love this thread!! Kudos!
I personally would not have split them up well except maybe blue d to throw superior numbers at the flanks. I would have had blue a take the right flank with blue d1 and blue b holding the center with blue d2 as reinforcements. Blue c would had the left flank until with pretty event fight ( read numbers 40 vs. 24 but less experienced). On the right side I have 60, as well as in the middle. Once we crushed the right side, fall back blue groups a and d1, regroup and then take out the left flank figuring I have lost 30 people or so. Attack the left flank with 30 more folks gives me 70 on that side which should overwhelm them. Once the flanks are destroyed we can circle the remaining red team with still pretty big numbers. If figure we lose 80 folks, with 80 left to fight the remaining red. The veterans might kill 100 but that still leaves like 60 on like 30 or so....still descent odds in my book.
Posted:
Thu Mar 20, 2008 1:28 pmby savetuba
I'd pull all my units to the left corner and have blue B and C hold a 90 degree line forming a box with the corner of the field serving as protection from being flanked. So with B facing the coming red and C protecting B's right flank at a 90 degree angle, I would then have blue D move into the middle of B and C (on the corner)so as to have the support units like spears help hold the wall where red A would most likely hit, while the shield men plug any gaps that form. Blue A would double as added defense for which ever flank is hit harder (like the left of B or the right of C) and if red doesn't place an equal number of people on one area (like they form hard on C but place few on B) they can break out on that side and move around behind the engaged red to create havoc while the lightly attacked line swings around. I would also give the order to have the majority of my support units (spears) focus on any skirmisher unit.
Posted:
Thu Mar 20, 2008 3:28 pmby Thomas MacFinn
Kyrian wrote:Is there a particular scenario people might be interested in doing
On a seperate thread:
Single small medium-armored vet unit with several small medium-armored novices and some small novice skirmisher groups vs single small heavy-armored vet unit and several small medium-armored novices and a lessor number of novice skirmisher groups.
Vets are a rare thing in most engagements.
Also, designate one unit the "command unit" with the assumption that complex commands are difficult to give after the battle is joined if far from the command.
Posted:
Thu Mar 20, 2008 9:37 pmby Big King Jimmy
Kyrian, given you expert opinion as a Belegarth Superstar, how would you have handled the situation?
Posted:
Fri Mar 21, 2008 11:14 pmby Outis
I am not a great strategist, but I hope by getting in here, I might improve a bit. I'd appreciate constructive criticism on this idea.
Blue is a huge disadvantage in experience and armor, frankly I think they're gonna get rolled. The best chance I see is overwhelming numbers.
Blue D runs hard at red G.
Blue B and C feint a charge at red A, but about half way C breaks off and slams into red F. hopefully red F will try to get into the hole between blue C and D and will get blindsided.

Meanwhile Blue B engages red A but keeps back pedaling. I'd put more of the glaives and spear into B so they can better keep the heavy armor from pushing through. The point is to pull red A out while Blue C and D overwhelm their skirmishers.
The real danger is the Left flank. The inexperienced blue A are gonna have to hold the flank against B and C. They have the numbers to do it, but Red will probably just try to go around them. So their orders are to "Choke their rivers with our dead!" They don't have to win, just keep them distracted long enough to for the right flank to fall. Newbies are tempting targets, they should engage just enough to get the vets to think, "Hey I can kill this guy quick and then flank the main group with no worries." I'm betting red D will try to flank blue B based on the original feint so blue A should only have to worry about red B and C.
If all goes well, blue B will keep pulling back until red F and G are gone, they should try to pull their left side back farther so as to rotate the line as much as possible They want to be facing the left field to minimize flanking potential. Then when F and G are gone blue B will push hard on red A, while blue C and D wrap around A and the remaining right skirmisher group.

If blue A did respectably and blue B rotated enough they should be able to survive the skirmisher flank while they are making the main attack on red A. The remnants of blue A reinforce the flank however they can
It sounds complicated because I am long winded, but really each group has one objective before focusing on red A.
I think my biggest problem is relying too much on B. B has the most difficult job, changing directions can be really difficult and the battle hinges on their ability to backpedal without taking heavy losses. If red E or D break through it could be very bad.
Well, most of my plans tend to fail, but that's how I'd try in this situation.
Posted:
Sat Mar 22, 2008 1:57 amby Elebrim
From the start, I would have tried to maximize on numbers. Each skirmish group, though highly experienced and well-armored, is only a fifth of the size of each of our groups. If all 3 on a side condensed into a larger block, we would still have almost a 2/1 ratio in favor of only one of our groups. Also, the starting position places A at a severe disadvantage maneuverability-wise; a slow, heavy-armor unit is good for a linefight, but is not going to be able to respond to flanking as easily.
Red is trying to bait-and-switch blue by using the heavy line to draw in numbers while flankers hit from the sides and rear. Instead of allowing that to happen, I would send A and B hard left and C and D hard right, directly engaging the flanking groups on the outsides to keep them from wrapping behind. B and C would have to stay toward the center in those maneuvers; having more experience, they would be more able to respond to a mass-shift by Red A or an inside wrap-around by Red D or E.
Assuming that the now over 3/1 ratio in our favor can overwhelm the enemy skirmish groups quickly enough before Red A has a chance to shift and advance, I would send the remaining forces from all four groups to continue the push and hit Red A from both sides, pincering it.
Posted:
Sat Mar 22, 2008 10:23 amby savetuba
Elebrim: You have to remember that the line unit will move slower than a skirmisher will. If I was red and saw your maneuver I'd pull A to the left (your right) towards your C and D. That will make your Blue D waver and loose any desire to push. I would have RED B, C, D move hard left as well to move around behind blue C and D. Now blue D will be scrambling and confused as where to go. RED A advances on blue C and D. Red E, F, G run hard right and do nothing but run circles around blue B while trying to get blue A to give chase.
Outis: Again, your line won't move as fast as the skirmishers. Red A will slide right (your left) to face blue A head on. The rest of red having plenty of room, will run circles around different units. Red's vets will try to keep blue D worried about moving at all, while picking off two or three of their numbers. If blue B/C does try a charge onto Red A, two of the red skirms will follow behind them and attack full on if the attack on red happens. Given blue A is mostly newbs they won't attack red A head on and will probably run around after any red unit. Red skirms will attack the flank of blue B/C, harass blue D, and make blue A run around behind them making blue A get in the way of the other blue units.
Remember:
*A unit of mainly new people won't want to engage a unit of fully armored Vets.
*Moving a line unit at high speed compromises you ability to fight effectivly and will result in many loses if attacked. (outis should remember chaos 11 when andor rushed across the field to attack the urks and only 2 of the original 12 made it)
Sun Tzu's method
Posted:
Wed Mar 26, 2008 5:25 pmby Aenaxis
So, I followed two Sun Tzu maxims here:
* When you outnumber the enemy, divide your forces.
* Deception is key in war.
In the first shot here, we see that all units march forward on the enemy. Then, at some signal, they simulaneously flank (shown by green), around the outsides.
My strategy here was to augment my own numerical advantage as much as possible. Hopefully, we can outflank the enemy on each side before the heavily armored unit gets to one side.

My light skirmisher unit will make itself a target for the heavy army by flanking around to the back and presenting what appears to be a nice little target to them. However, when the heavy army makes this move towards the light skirmishers, I begin my second phase.

The light skirmishers sprint around the heavy armor to the north and come slamming into the backside of the already engaged heavy armor. The other unit does the same. At this point, the eastern heavy armor of my enemy should be all but annihalated and the rest weak, so I turn my entire force on them, flank and destroy.
I'm taking advantage of their two key weaknesses here: they're slow, and dont have the numbers. I'll be able to run circles around them with my less-armored, more-mobile troops, and flank them well and often.
Posted:
Wed Mar 26, 2008 6:34 pmby Elebrim
savetuba wrote:Elebrim: You have to remember that the line unit will move slower than a skirmisher will. If I was red and saw your maneuver I'd pull A to the left (your right) towards your C and D. That will make your Blue D waver and loose any desire to push. I would have RED B, C, D move hard left as well to move around behind blue C and D. Now blue D will be scrambling and confused as where to go. RED A advances on blue C and D. Red E, F, G run hard right and do nothing but run circles around blue B while trying to get blue A to give chase.
True, but a hard shift to either direction by any part of the Red line opens it up entirely for a back-munch by the other half of my force. Even if Red directs all of its firepower toward blue C and D, A and B can just as easily evade the red skirmishing groups and double-team the heavy line and support skirmishers. This will still give blue the numbers advantage, though it will create a difficult scenario in the long-run as for engaging the remaining red.
*Edit: This is basically turning into an adapted version of the above second image, only with Red A going the opposite direction.
Posted:
Tue Apr 15, 2008 10:48 pmby sugona
Interesting thread. The only thing is getting a group of fighters that are all that coordinated, perhaps I'm too new to make that judgment though.
