Riveted maille, step by step

Leather, Chain and Plate

Moderators: Enderonimus, Belegarth: Forum Moderators

Riveted maille, step by step

Postby Doug C » Wed Nov 26, 2008 5:45 pm

This is a little step by step I posted on the forums of a LARP/boffer group I frequent. I figured I would go ahead and share it here.

Special thanks to CLANG for helping me make (well, he did pretty much all of the work) the punch tongs, and the rivet set tongs are from Steve Forth and are supposed to be defective in some way, only usable by righties or something.

The cat belongs to my wife.

I was going to show off my new pin rivet punch and I figured since I have all my stuff out I may as well at least try to contribute something to the community while I'm at it.

This is going to span multiple posts because it has several pictures. You can view all these photos at http://picasaweb.google.com/dougconfere/Maille#

Okay! We're going to be making some riveted maille today. Specifically, I'm going to be showing you how I make the maille for my Templar kit. It is 17 ga. ~5/16 inch round rings with round rivets with alternating solid rings. Curiously, I have a considerably harder time with round rivets or pin rivets than I do with wedge rivets. But wedge rivets aren't proper for the time I'm going for, so I'm using pin rivets.

The first step, which is not pictured here, is to procure some wire. I get 17 gauge wire in quarter mile spools from Lowes. Galvanized wire sucks, so I strip the galvanization with muriatic acid or pool acid. If you decide to do this yourself (you can do it to completed pieces as well), dilute a gallon of acid into 4 gallons of water and have a 5 gallon bucket of water saturated with baking soda on standby. The fumes will hurt or kill you, so avoid them. Drop the galvanized into the acid and watch it erupt like a volcano. When the bubbling dies down (you WILL notice), remove the steel from the acid and put it into the bucket of baking soda water, which will also explode. Then dry remove it from the water, sprinkle it with baking soda, dry it, and oil it.

Here are the tools we need:
Image

We have a mandrel, for winding wire into coils, wire, solid rings (25,000 of them), a propane torch, a ring flattener and 'anvil', wire cutters modified to cut overlapped rings, rivet setting tongs, and a ring hole punch. And some valium.

Image

The ring smasher is just a piston. This one has enough play in it that I can tilt the piston in one way or another to flatten only a portion of the ring. In this case, we will use this to just flatten the overlap on our rings, as flattened rings aren't appropriate for the time period I'm going for.

Image

The rivet setting tong does two things: the hole is for driving the rivet all the way into the ring (the opposite side is flat), and the depression is for actually piening the rivet. You can make these with any kind of nips or tongs with flat faces.

Image

These wire cutters cost like $2.50 from Harbor Freight. The nose is shortened and a notch has been made to allow it to cut overlapped rings from coils.

Image
Image
The punch tongs are made from a set of tile nippers from Home Depot. The carbide tips were removed, the jaws were annealed and then ground flat, and holes were drilled and tapped for the receptable (the * there), the punch itself, and the * that holds the punch in. The punch is made from a tool steel pin. The receptacle hole in the * goes to a hole that goes out the side of the * so that punched out portions of steel don't clog up the receptacle.

Image

You can get these pins from Enco, and I'm sure other places, for next to nothing. A box of 50 is $8 or something. We don't have a metal lathe so we put it in a drill and shaped it on a belt sander. A quick operation but it's hard to get it the same size as the receptacle.

Image

Using solid rings means you only have to make half of the total rings, which makes things REALLY easy. Luckily, alternating solid rings is appropriate for what I'm going for. Get rings at seastrom-mfg.

Image

If you have any old failed projects, like mine above, it's a good idea to keep them handy to remind yourself not to * up.

Image

And cats are very important for moral support.

Now that we have everything, we can get started.

If you're interested in doing riveted maille, you can probably already do butted maille, so you know how to wind coils. But it's still the first step, and will be pictured here.

Image

Then we can cut our overlapped rings. Some people cut butted rings and overlap them by hand. Some people take butted rings and drive them through a cone to overlap them. I just cut them overlapped. You may prefer another method.

Image

We need to anneal the rings prior to flattening. If you try to flatten the rings without annealing them first, the ends will likely skip off one another and you'll ruin your ring. So, I put my rings on a wire and heat them to a cherry red with my torch.


Image

Now we can flatten our rings. My ring smasher is made in a perculiar way and the piston doesn't separate from the cylinder, so I can't take out the piston and drop in the ring, so I have to set the ring on my 'house anvil' and place the piston over it.

Image

By applying pressure forward with my thumb, I can angle the piston to flatten only the top portion of the ring, which in this case is the overlap.

Image

And here we have our rings! Notice some of mine are pretty crappy. Yeah yeah, I'm out of practice. So sue me.

Image

It's time to punch the rings. Be careful when you do this, if you punch off center enough you can ruin your ring.

Image

And here we have our punched rings.

Image

So let's make some rivets. Just clip some short pieces of wire. For these rings we are using 18 ga. wire stripped of galvanization.

Image

Annealing your rivets isn't necessary, but it will make the piening easier.

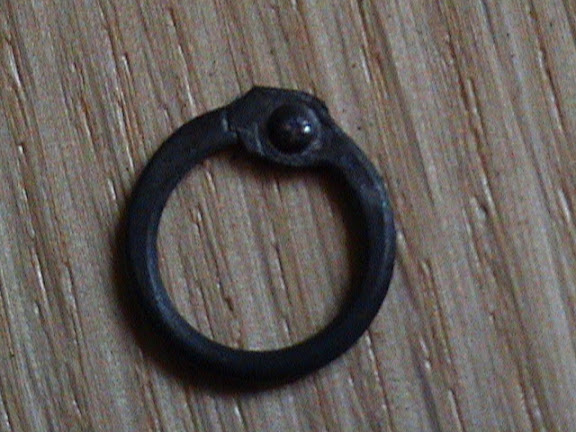
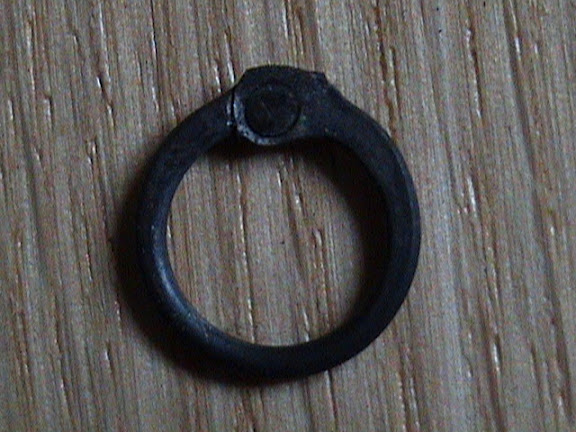
So let's make a test ring. We push the rivet into the ring with our thumb, drive it completly into the hole with our set tongs, then pien the rivet with our set tongs. It looks like this:
Image
Image

We have an ovular rivet head because I'm using wedge rivet set tongs. I doubt anyone will be chasing me down and chastising me for my rivet heads, though. You can see that the back side of the rivet is flush, this is proper.

So we're ready to rivet. But did you notice how shiney those brand new solid rings are? If you make maille with those shiney rings and your blackened riveted rings you'll end up with pin stripes. So we're going to heat our solid rings to make them the same color as our riveted rings so we don't make a zoot suit of maille.

Image

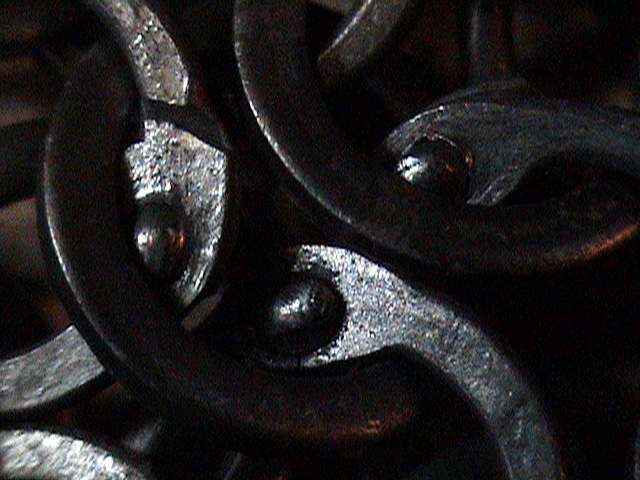
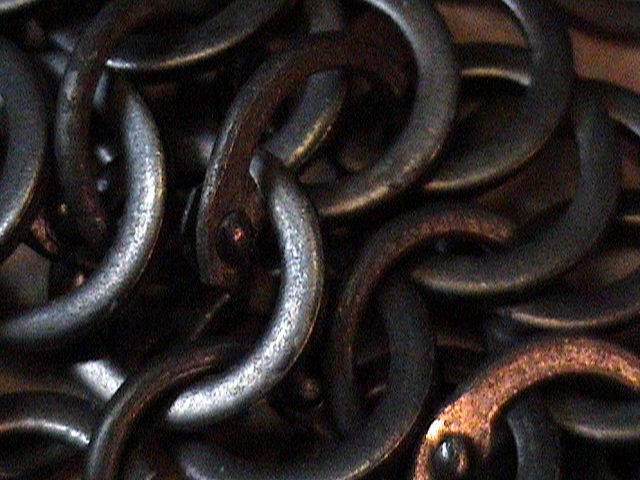
So now we're ready to make some freakin' maille! I'm not going to teach you to weave maille, but I will warn you that there IS a top and bottom to both riveted rings AND solid rings (the solid rings are punched, just look at my pictures you can see I messed some up) so double check your rings' orientation before rivetting.

And behold the fruits of our labor:

Image

Image

Image

Image

Image

Image

Image

Image

Image

Image

Image

Image

Image
Last edited by Doug C on Wed Nov 26, 2008 6:17 pm, edited 1 time in total.
Doug C
Recruit
Recruit
 
Posts: 11
Joined: Wed Nov 26, 2008 5:26 pm
Started Fighting: 01 Jan 2000
Realm: Aratari
Unit: TOotPKoCatToS

Re: Riveted maille, step by step

Postby Derian » Wed Nov 26, 2008 5:51 pm

Awesome.
- Derian -

"An octopus has eight arms, three hearts, five *, two Super Bowl rings, a beak, and the power to solve crimes."
User avatar
Derian
Become One With the Wind
 
Posts: 5969
Joined: Sat Apr 05, 2003 4:20 pm
Location: Cedar Falls, IA
Started Fighting: 01 Apr 2001
Realm: Nan Belegorn
Unit: Hellhammer
Favorite Fighting Styles: Sword & Board
Pronouns: He / Him

Re: Riveted maille, step by step

Postby Ilariia Bulochnika » Wed Nov 26, 2008 6:17 pm

Wow....gold star. :eek:
-Ilariia Bulochnika, Esquire.
Viking Buddy
Food Craftsman
Kensman

The hero Belegarth deserves, but not the one it needs right now. So we'll hunt him because he can take it. Because he's not our hero. He's a silent guardian, a watchful protector. A Viking *.
User avatar
Ilariia Bulochnika
Grizzled Veteran
Grizzled Veteran
 
Posts: 3322
Joined: Mon Apr 19, 2004 8:32 am
Location: BFE Kentucky
Started Fighting: 0- 3-2003
Realm: Knights Hollow
Unit: Empire of the Wolf
Favorite Fighting Styles: Mace and Board
Flail and Board
Archery

Re: Riveted maille, step by step

Postby Dacian » Thu Nov 27, 2008 12:38 am

sticky....sticky.....STICKY....

who's a badass? that guy.
Kyulick Division of the War Machine
Image

Tiercel wrote:Sometimes I stay on my knees for so long, I forget, and have to leave them both down.
User avatar
Dacian
Slayer
Slayer
 
Posts: 1122
Joined: Mon Mar 13, 2006 9:38 am
Location: K-Town, mofo's
Started Fighting: 0- 6-1997
Realm: Khatovar
Unit: Kyulicks
Favorite Fighting Styles: Thunder and Lightening.

Re: Riveted maille, step by step

Postby Derian » Thu Nov 27, 2008 12:47 am

Added to the tutorials sticky.
- Derian -

"An octopus has eight arms, three hearts, five *, two Super Bowl rings, a beak, and the power to solve crimes."
User avatar
Derian
Become One With the Wind
 
Posts: 5969
Joined: Sat Apr 05, 2003 4:20 pm
Location: Cedar Falls, IA
Started Fighting: 01 Apr 2001
Realm: Nan Belegorn
Unit: Hellhammer
Favorite Fighting Styles: Sword & Board
Pronouns: He / Him

Re: Riveted maille, step by step

Postby Arrakis » Thu Nov 27, 2008 9:10 am

Doug: Hey! You're allowed to say you posted it on the Dag forums. We won't stake you, promise.

Even more mind-blowing the second time around.
User avatar
Arrakis
Warning: Knows Math
 
Posts: 4784
Joined: Mon Jun 18, 2007 3:24 pm
Location: Central Jersey
Started Fighting: 17 Jun 2007
Realm: Crystal Groves
Unit: Omega
Favorite Fighting Styles: No gimmicks.
Pronouns: He/Him

Re: Riveted maille, step by step

Postby Doug C » Thu Nov 27, 2008 11:06 am

lol yes, I forgot these forums were considerably less Draconian :P

Glad you guys like it, and I hope someone gets some use out of it!
Doug C
Recruit
Recruit
 
Posts: 11
Joined: Wed Nov 26, 2008 5:26 pm
Started Fighting: 01 Jan 2000
Realm: Aratari
Unit: TOotPKoCatToS

Re: Riveted maille, step by step

Postby Old Horse » Thu Nov 27, 2008 11:17 am

Excellent tutorial, thank you very much for sharing it.
"Never violate a woman, nor harm a child. Do not lie, cheat or steal.
These things are for lesser men.
Protect the weak against the evil strong.
And never allow thoughts of gain to lead you into the pursuit of evil."

-The Iron Code of Druss.
User avatar
Old Horse
Scout
Scout
 
Posts: 295
Joined: Fri Dec 14, 2007 11:27 am
Location: Puerto Rico.
Started Fighting: 0- 5-2004
Realm: Umbar
Unit: Black Corsairs
Favorite Fighting Styles: Spear, Two-handed sword, Single blue

Re: Riveted maille, step by step

Postby Forkbeard » Fri Nov 28, 2008 7:48 am

Very nice work.
Thanks man.
FB
Warlord of the Western Uruk-Hai

Don't call it a comeback
I been here for years
Rockin my peers and puttin suckas in fear
User avatar
Forkbeard
Grizzled Veteran
Grizzled Veteran
 
Posts: 5604
Joined: Tue Apr 22, 2003 5:46 pm
Location: Kung Foo Island
Started Fighting: 15 Jun 2000
Realm: Aquilonia
Unit: Western Uruk Hai
Favorite Fighting Styles: Just the Tip

Re: Riveted maille, step by step

Postby Arrakis » Fri Nov 28, 2008 8:09 am

So, Doug, you ever get a hauberk or a coif or anything made out of this stuff? Any pics?
User avatar
Arrakis
Warning: Knows Math
 
Posts: 4784
Joined: Mon Jun 18, 2007 3:24 pm
Location: Central Jersey
Started Fighting: 17 Jun 2007
Realm: Crystal Groves
Unit: Omega
Favorite Fighting Styles: No gimmicks.
Pronouns: He/Him

Re: Riveted maille, step by step

Postby Doug C » Fri Nov 28, 2008 9:40 am

Here is the only pic I have of either of us (the other Templar and I are making identical kits, we're both mailling) in kit. You can see the hauberk. We're making hoods w/face flaps, mitts, and maille hose to complete the armour. We're hoping to have it all done by Rag.

http://serenity.thirtythreepointone.com ... m=9&pos=28

Click on the high res and you can see the maille.
Doug C
Recruit
Recruit
 
Posts: 11
Joined: Wed Nov 26, 2008 5:26 pm
Started Fighting: 01 Jan 2000
Realm: Aratari
Unit: TOotPKoCatToS

Re: Riveted maille, step by step

Postby Arrakis » Fri Nov 28, 2008 3:44 pm

Ludicrous!

Looks excellent. That's gonna be some poundage of maille by the time you're done!
User avatar
Arrakis
Warning: Knows Math
 
Posts: 4784
Joined: Mon Jun 18, 2007 3:24 pm
Location: Central Jersey
Started Fighting: 17 Jun 2007
Realm: Crystal Groves
Unit: Omega
Favorite Fighting Styles: No gimmicks.
Pronouns: He/Him

Re: Riveted maille, step by step

Postby Doug C » Fri Nov 28, 2008 4:32 pm

It's around 30 lbs as is. If I were doing 14th or 15th century it could be considerably lighter, but for late 12th century Crusader the stuff is pretty heavy duty.
Doug C
Recruit
Recruit
 
Posts: 11
Joined: Wed Nov 26, 2008 5:26 pm
Started Fighting: 01 Jan 2000
Realm: Aratari
Unit: TOotPKoCatToS


Return to The Armory

Who is online

Users browsing this forum: No registered users and 25 guests