UPGRADE!

Here is some of the stuff I've been using most often.
There is a new Tandy Leather Store in town so I have taken advantage of their grand opening sale.
I've also been hitting up my university store's art supply department and I got some great deals on stuff like cutting tools, cutting mats, and sponges and brushes.
For this new year and to warm myself up to tooling again I started work on some greaves.
My goal was to have them ready to go before Battle for the Ring 5 which I mostly did but only because I made the straps onsite. I kind of rushed them too so the straps and buckles are a little wonky. I'll replace them later.
I had an old side that needed cutting into. It floats around 10-13oz which is a little thick for what I normally want but this was for greaves so whatever.
This was a great opportunity to do three things: use a grid with my new stamps, use a new dye brand, and use a tooling pattern.

Like I said, I'm all about color and high contrasts so if this sickens you, turn back now.
Also, somebody said that I look like a Lego knight.
Good, because I love Legos.
I started with a template that I borrowed from my main man Rope.

Yeah, I'm lazy and didn't make my own. So what?
I adjusted the template to fit the look I had in my head. Mostly, I just widened the parts around the ankle and added an arch to the top to make it taller than my shins.

I bought a set of French Curves a few days after I cut these out. They would have helped out so much. Man, if you make garb or armor, buy a set. I think the plastic ones that I bought were like $4 for the set. Maybe I'll post up something where I used them later.
Here are the two blanks.

Oh and FFFFFFFFFFFFFFFFFFFFFFFFFFF!!!!!!
So yeah, I botched these. I have my rights and lefts correct but I didn't look over the hide as closely as I should have before I cut into it.
As a result, there is a huge mar and hole in the left greave just above the ankle.
At first I didn't know what to do other than make a greave with a hole in it. I considered making straps that would cover it but that would break up the horizontal lines that I had envisioned. (I'm short, I need all the horizontals that I can get.)
I came up with a game plan.
Here is where I cleaned up the edges with a file and French edger.
http://i48.tinypic.com/15dlz9.jpghttp://i49.tinypic.com/16bzkg4.jpgHere is where I outlined my design before I cut it out with my swivel knife. I use a 02 Micron fine point pen to trace my final lines onto the leather. I only use this where I plan on running over with the swivel knife. The ink is water proof so it stays on after I soak the leather and lets me see what I'm doing.
http://i47.tinypic.com/2rf6gs1.jpgI didn't have a compass on hand so I just guessed that my drafting tape would fit the lion stencil I planned on using.
http://i46.tinypic.com/14brrc.jpgHere are the two blades that I will be using for this part:
One is a flat 1/2inch blade and the other is a thinner 1/4 inch blade with a taper. I can't remember what the sizes are really called but bare with me. The smaller one is for detail lines and small curves.
http://i48.tinypic.com/35n4osm.jpgThis is the pattern I used to decorate each greave.

All you need to do is wet the leather and mush the pattern into the surface. It'll be subtle but enough to cut out. I had had this one for years and never used it. There are catalogs of patterns that work like this. Search for some and seriously, you'll find hundreds. It's kind of a fun thing to try.
I used a grid here too. It works the same as the lion pattern.

This will help me with my geometric stamps.
I got this grid from Tandy:
http://i47.tinypic.com/28paox.jpgIf you get that one do yourself a favor and cut it up. It makes it easier to work with.
http://i50.tinypic.com/290vupw.jpgAh, yeah...

This will look good but the time it eats up is not cool.
I watched a lot of Hulu while I rattled my work surface tooling these out.
Hours later:

Let that dry out. I put mine in the oven a little just to get the residual moisture out of them but they probably didn't need it.
Don't be a dumbass. Use gloves and do your dying in a shop or garage.
Dye ruins everything. (Or do it in your house, I don't really care)
http://i46.tinypic.com/21do8jb.jpgCut up your sponges to get more uses out of them. No need to waste a whole sponge making one piece of armor.
Look at that blue! Holy *! That Eco-flow dye makes really vibrant color. You can pretty much paint with it. It is really expensive though. Also, it doesn't dilute with alcohol so don't make that mistake like I did. After playing around with it on some samples, I just added it directly to leather for the best color I could get.

Now, they didn't have metallic gold dye or else I'd buy them out of it. Acrylic paint works great too. It just needs to be given a finishing coat of something to protect it from flaking off then the leather bends and stretches. Speaking of I just use cheap as dirt Americana acrylic sealer/finisher. I've got matte and glossy but I use more matte because the glossy, even in the smallest dose, makes everything look like lubed up plastic.
Oh, gurl...

And bam!

Remember that hole I had?
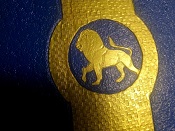
I made a little prayer seal dangle with a suede leather scroll on it to cover than blemish up. Ain't I a stinker?
Here are the pieces post BftR5. They got a little worn but the leather is tougher where I tooled it and the dye and finish I applied really help the integrity.

Here's a close up of the seal

Questions and comments are always appreciated.
If you were at Battle for the Ring 5 and got a good picture of me wearing these, I'd like a link to that photo please. I'd be really grateful.
 Links
Links


 .
.


